|
||||||


Back to OPaC official ![]() page.
page.
|
||||||||
| Last updated February, 13th 1998. | Back to OPaC official |
|||||||
This document explains, step by step, how to assemble the user interface of a sample program. This does not involve any programming skills, so anybody familiar with computers should be able to build or modify the program's user interface.
All you need is the OPaC demo application executable and its associated files. These files are currently available both for Windows 95/NT as OPaC-win32-bin.1.0.0.zip (the Linux/X11 version must be compiled from the sources). No sources are needed in order to complete the tutorial !
The demo application is a very simple program which multiplies two values X and Y and produces the result Z = X*Y. You will build the complete interface yourself in less than five minutes. The interface will look like this :

When starting the demo application, several windows open on the screen :
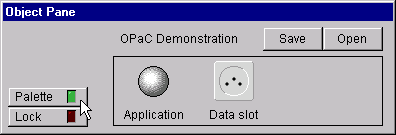
The Object Pane presents a few important elements :
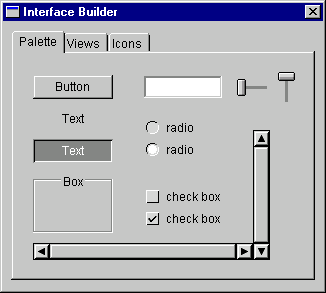
The Interface Builder window presents a palette with the most frequently used interface widgets, as can be seen on the picture below :
In order to add a button in the OPaC Demonstration window, the following steps are required :
Pick the button from the Interface Builder palette (point the mouse and press the mouse button) :
![]()

Adding widgets is as simple as that : select the widget from the Interface Builder, then drag and drop it to the destination.
In order to move or resize the button you just dropped in the OPaC Demonstration window, the following steps are required :
![]()
Drag the button by its body in order to move it around. Move it to the bottom left corner of the window.
Drag the handles in order to slightly resize the button.
You can de-select the button by Control-Shift-clicking on it.
Moving and resizing widgets is as simple as that : Control-Shift-click on the widget in order to select it, then drag the widget or its handles. You can select several widgets at the same time. The active one has a bright red border whereas the others have a darker border.
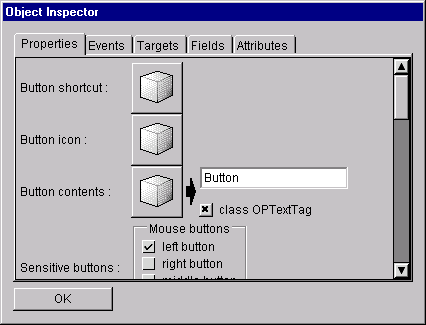
In order to edit the button, the following steps are required :


![]()
Editing the properties of a widget is as simple as that : Shift-click the widget to pop-up the selection menu. Choose Inspector... in the menu to open the Object Inspector. Changing the properties immediately affects the selected widget.
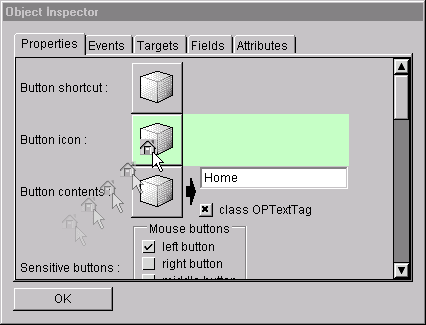
In order to add an icon to the button, the following steps are required :
![]()

![]()
Some widgets have complex properties represented by other objects. Modifying these properties is as simple as that : drag and drop the desired widget onto the corresponding object well. You can delete an object by clicking on the object well's small close box. Some simple objects can be edited directly in the object well (such as text tags). Others can be edited by Shift-clicking the object well itself and selecting Inspector... from the menu.
There are a lot of other interesting properties which can be modified at will. You can for instance change the way the button reacts to mouse clicks. The following steps are required :
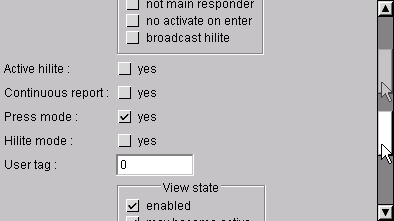
In order to add a vertical scroller to the OPaC Demonstration window, proceed in the same way as explained for the button. You will then change its properties. The following steps are required :
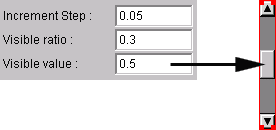
The properties have the following meaning :
Add a text line to the OPaC Demonstration window. This will not need any modification, so simply drag and drop it nearby the vertical scroller.
The user interface you have just built contains three widgets : a button, a scroller and a text line. These widgets are functional (you can click on them, edit them, etc.) but they don't interact with the application. In this sense, they are still useless. They need to be connected with other objects.
In order to connect two objects, the following steps are required :


You have just established a connection between the text line's Text property and the scroller's VisibleValue property. You can now type a value between 0.0 and 1.0 in the text line and watch the scroller move.
If you move the scroller, you will notice that the text line does not change. You have to establish a connection between the scroller and the text line in order to have a bidirectional connection. The following steps are required :
You are done. Moving the scroller now updates the value in the text line... Congratulations, you have just interconnected two objects with no programming at all !
The user interface now seems more useful, but in fact, no real work is done yet. The text line reflects the changes of the scroller and vice-versa. That's all.
In order to get some real work done, you will have to connect the user interface to the application. But first, add a second text line and a second scroller, which you interconnect like the first ones. Then, add a third text line.
In order to connect the interface to the application, the following steps are required :
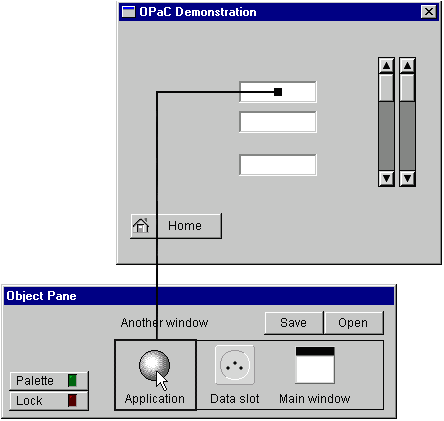
You have just established a connection between the user interface and the application. Whenever the user types something into the first text line, the X field of the application gets updated. In your case, X has been published by the application as being a real number.
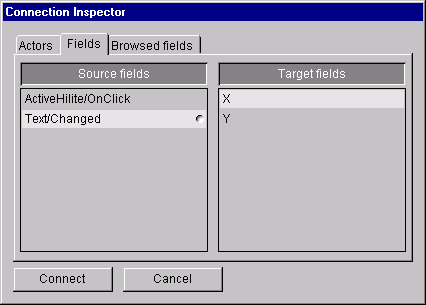
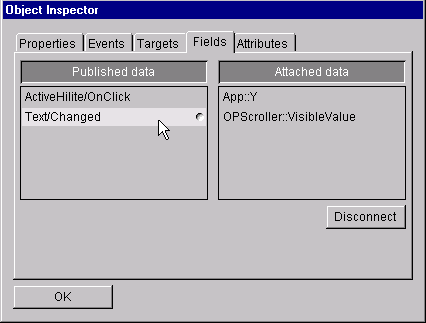
Note that the Text/Changed field was already connected to the scroller. This is why a small bullet is displayed on the right of the field in the connection inspector :
![]()
Proceed with the second text line and connect it with the Y field of the application.
You can now check the behaviour of your interface : when you type values in the two text fields, the scrollers move and the X and Y fields of the application get updated. Yet, no useful result is produced.
In order to produce some useful result, you still need to connect the application with the interface. The demo application uses the X and Y values to produce a result Z, which is the product of X and Y.
In order to connect Z to the user interface, the following steps are required :
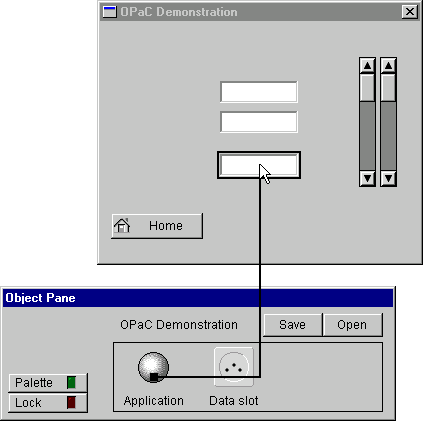
The third text line will now be updated whenever Z changes. Since Z changes whenever X or Y change, you get an automatic update of the displayed product, whenever one of the two inputs changes. Try it out ! You can type values in the text lines or move the scrollers...
You can also connect events with actions. In order to terminate the application when the user clicks on the "Home" button, the following steps are required :
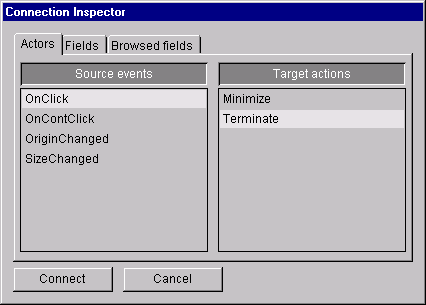
Clicking on the "Home" button now would terminate the application. Before you try this out, you had better save your work. Click on the Save button in the OPaC Interface Builder. The next time you launch the demo application, you will get back to the current interface. Everything will be restored in the exact same way (including the connections between the objects and with the application). The interface is saved in a file named "OPaC demonstration".
You can inspect the connections between the objects by selecting an object and opening the Object Inspector. The events and the fields which are connected to other objects show up with a bullet on their right. By clicking on such an event or field, it is possible to see with which actor or field the connection has been established.
In order to see how the fields of the second text line are connected, the following steps are required :
In just a few minutes, you have built the interface of a simple application. Moreover, you have established interconnections between the interface and the application, without having to modify or recompile the source of the application !
You can copy the interface description file to another platform (for example from Windows 95 to Linux/X11) and use it as is. You don't need to adapt anything. Moreover, since OPaC implements its own widgets, the look and feel will be exactly the same !
The OPaC class library is one of the most powerful ways to quickly build and maintain portable user interfaces.